Docker 中心快速入门
以下部分包含有关如何开始使用 Docker Hub 的分步说明。
第 1 步:注册一个免费的 Docker 帐户
首先创建一个 Docker ID。
Docker ID授予 您访问 Docker Hub 存储库的权限,并允许您探索来自社区和经过验证的发布者的可用映像。您还需要一个 Docker ID 才能在 Docker Hub 上共享镜像。
提示
探索 Docker 的核心订阅,了解 Docker 还能为您提供什么。
第 2 步:创建您的第一个存储库
创建存储库:
- 登录 Docker Hub。
- 在存储库页面上,选择创建存储库。
- 将其命名为<your-username>/my-private-repo。
- 将可见性设置为Private。
- 选择创建。
您已经创建了第一个存储库。
第 3 步:下载并安装 Docker Desktop
您需要下载 Docker Desktop 来构建、推送和拉取容器映像。
下载并安装Docker 桌面。
使用您在第一步中创建的 Docker ID 登录 Docker Desktop。
第 4 步:从 Docker Hub 拉取并运行容器映像
在您的终端中,运行
docker pull hello-world以从 Docker Hub 中提取映像。您应该看到类似于以下内容的输出:$ docker pull hello-world Using default tag: latest latest: Pulling from library/hello-world 2db29710123e: Pull complete Digest: sha256:7d246653d0511db2a6b2e0436cfd0e52ac8c066000264b3ce63331ac66dca625 Status: Downloaded newer image for hello-world:latest docker.io/library/hello-world:latest运行
docker run hello-world以在本地运行图像。您应该看到类似于以下内容的输出:$ docker run hello-world Hello from Docker! This message shows that your installation appears to be working correctly. To generate this message, Docker took the following steps: 1. The Docker client contacted the Docker daemon. 2. The Docker daemon pulled the "hello-world" image from the Docker Hub. (amd64) 3. The Docker daemon created a new container from that image which runs the executable that produces the output you are currently reading. 4. The Docker daemon streamed that output to the Docker client, which sent it to your terminal. To try something more ambitious, you can run an Ubuntu container with: $ docker run -it ubuntu bash Share images, automate workflows, and more with a free Docker ID: https://hub.docker.com/ For more examples and ideas, visit: https://docker.github.net.cn/get-started/
第 5 步:构建容器映像并将其从计算机推送到 Docker Hub
首先创建一个 Dockerfile来指定您的应用程序,如下所示:
# syntax=docker/dockerfile:1
FROM busybox
CMD echo "Hello world! This is my first Docker image."
运行
docker build -t <your_username>/my-private-repo .以构建您的 Docker 映像。运行
docker run <your_username>/my-private-repo以在本地测试您的 Docker 映像。运行
docker push <your_username>/my-private-repo以将 Docker 映像推送到 Docker Hub。您应该看到类似于以下内容的输出:$ cat > Dockerfile <<EOF FROM busybox CMD echo "Hello world! This is my first Docker image." EOF $ docker build -t mobythewhale/my-private-repo . [+] Building 1.2s (5/5) FINISHED => [internal] load build definition from Dockerfile => => transferring dockerfile: 110B => [internal] load .dockerignore => => transferring context: 2B => [internal] load metadata for docker.io/library/busybox:latest => CACHED [1/1] FROM docker.io/library/busybox@sha256:a9286defaba7n3a519 => exporting to image => => exporting layers => => writing image sha256:dcdb1fd928bf257bfc0122ea47accd911a3a386ce618 => => naming to docker.io/mobythewhale/my-private-repo $ docker run mobythewhale/my-private-repo Hello world! This is my first Docker image. $ docker push mobythewhale/my-private-repo The push refers to repository [docker.io/mobythewhale/my-private-repo] d2421964bad1: Layer already exists latest: digest: sha256:7604fbf8eeb03d866fd005fa95cdbb802274bf9fa51f7dafba6658294 efa9baa size: 526笔记
您必须通过 Docker Desktop 或命令行登录 Docker Hub,并且还必须按照上述步骤正确命名映像。
Docker Hub 中的存储库现在应该在Tags下显示一个新
latest标签: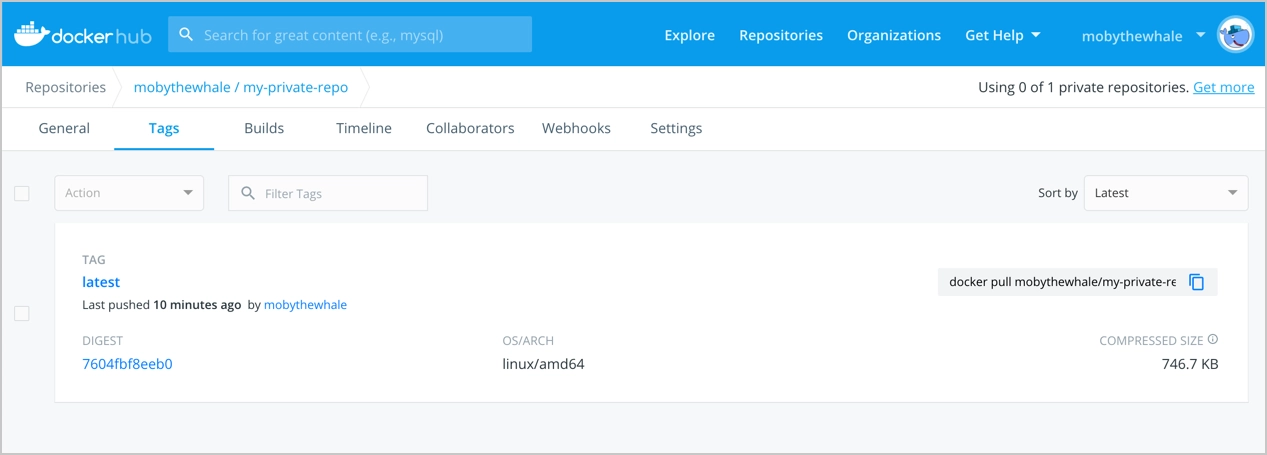
您已经成功:
- 注册了 Docker 帐户
- 创建了您的第一个存储库
- 从 Docker Hub 中提取现有容器映像
- 在您的计算机上构建您自己的容器镜像
- 已成功推送到 Docker Hub